What is the 403 Forbidden Error and How to Fix it?
As you have come here, it implies you as of late went over an error message saying 403 Forbidden – you don’t have permission to access/on this server. What’s more, undoubtedly, you have no thought what is the issue here. All things considered, don’t stress! This is a very common situation that many web users run into. Before becoming more acquainted with how to fix it, let us see what the error truly is.
What Is a 403 Forbidden Error?
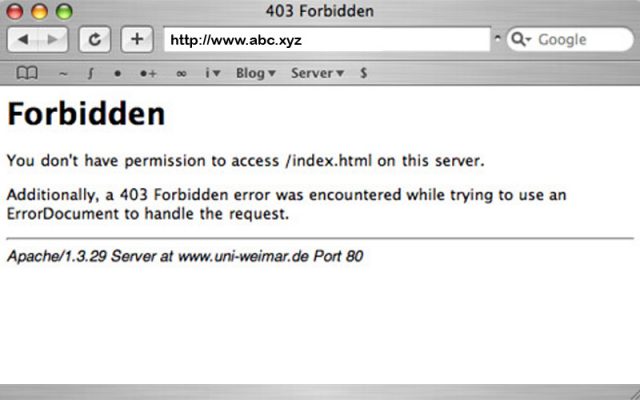
The 403 Forbidden error identifies with an HTTP status code which for the most part happens when the web page (or different resources) that you’re attempting to open in your web browser is a resource that you’re not permitted to access. It implies that the server is declining to make any move even after understanding your request. 403 errors are brought about by issues where you’re attempting to access something that you don’t have access to.
There are fundamentally two reasons behind this Error. These are:
- Incorrect file or folder permissions
- Incorrect settings in the .htaccess file
Since we realize the different factors causing the error, the time has come to see how to dispose of it. The steps mentioned here chiefly centre around WordPress, yet they can be applied to different websites too. We should go through a portion of the steps in question:
Check .htaccess File
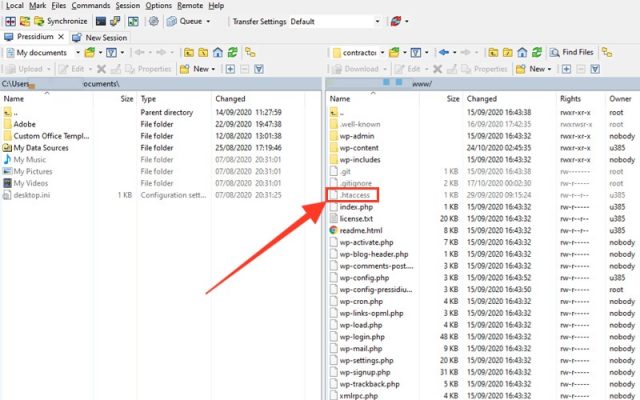
You may not be acquainted with the .htaccess file. This is because the file regularly stays hidden in the project directory. If you are utilizing a cPanel, it very well may be seen by accessing your hosting Control Panel with the assistance of the File Manager. We should go through the steps in question:
- Find File Manager from the hosting Control Panel
- In the public_html directory, search for .htaccess file.
- On the off chance that you don’t run over any .htaccess, you can tap on Settings and empower Show Hidden Files (dotfiles) option.
To assist you with understanding the .htaccess file better – it’s a server configuration file and predominantly works by changing the configuration on the Apache Web Server settings. Albeit the .htaccess is available in practically all WordPress websites, on some uncommon occasions, when your website doesn’t have a .htaccess or is deleted unintentionally, you need to make a .htaccess file manually. Presently, that you have discovered your .htaccess, all you need to do is:
- Download the .htaccess to your PC to have a backup of it.
- Once done, delete the file.
- Presently, have a go at accessing your website.
- On the off chance that it works fine, this essentially demonstrates that your .htaccess file was corrupt
- To create a fresh .htaccess file, login to your WordPress dashboard, and tap on Settings › Permalinks.
- Without rolling out any improvements click the Save Changes button at the bottom of the page.
- This will create a fresh .htaccess file for your website
However, if this doesn’t tackle the issue, move onto the following technique.
Reset File and Directory Permissions
Another reason for experiencing a 403 Error Forbidden message is terrible permissions for your files or folders. By and large, when files are made, they accompany certain default permissions. These essentially control how you can read, write, and execute the files for your utilization. However, a FileZilla FTP client additionally gives all you need to edit file and folder permissions. To start, you ought to:
- Access your website files utilizing any FTP client.
- Explore the root directory of your hosting account.
- Select the main folder which contains all your website files (generally it’s public_html), right-click on it, and select File Attributes.
- Choose to Apply to directories only, enter permission 755 in the Numeric value field, and press OK.
- Once FileZilla is done changing folder permissions repeat step 3, however, this time select the Apply to files the only option and enter 644 in the Numeric value field.
- Once done, take a stab at accessing your website now, and check whether the 403 forbidden error is tackled.
Disable WordPress Plugins
Suppose you have come this far; odds are high that the error was tossed because of an incongruent or faulty plugin. In this step, we will have a go at disabling plugins to check whether it fixes the 403 Forbidden Error. The best activity is disabling all the plugins at once as opposed to going through the interaction separately. With this step, you would have the option to distinguish the issue and work towards a solution. Here’s what you have to do:
- Access your hosting account with FTP and search for the public_html folder (or the folder containing your WordPress installation files).
- Find the wp-content folder on the page.
- Find the Plugins folder, and rename it something other than what’s expected like “disabled-plugins” so it is simpler to monitor.
Once you have disabled all the plugins, take a stab at accessing your website once more. Did this fix the 403 forbidden issues? On the off chance that indeed, a tricky plugin is the real source of error. Take a stab at deactivating your plugins one by one, and check if your website is back in working action now. This way you will want to distinguish the faulty plugin. You would then be able to decide to update the plugin on the off chance that it is vital or install another one. However, if nothing of the previously mentioned steps worked for and the error message shows up, you may have to contact your hosting provider.
By following the techniques recorded above, you can dispose of the 403 forbidden error. We understand that this error message causes extraordinary frustration as you can’t access your website or a web page. In any case, follow the previously mentioned steps one by one, and we’re certain, you’ll have the option to take your website back to action.